How to create your own Twitter background
Posted on June 10th, 2009 by Glenn Reffin
There have been a number of blog posts covering Twitter background images. Most articles give general guidance on the dimensions of the background. Very few of them advise on where to place objects in the background. The reason for this is that the Twitter interface relies on the screen resolution of the viewer’s computer and it is difficult to optimise your Twitter background for all resolutions. This post gives some more guidance on how to develop your own Twitter background.
Why create a Twitter background?
A Twitter background gives you an opportunity to express yourself or your brand more effectively than the 160 character limit available in the bio. It is likely that more people will be interested in finding out about you if you express your personality or brand through your background image, which is an additional piece of screen real estate that offers you an opportunity to tell visitors about who you are.
While the Twitter background does not provide the ability to add hyperlinks, it does give you the opportunity to add URL text to the image, so that people can find your website. So, while they won’t be able to click on a link in your background image and be transported to your web site, they will be able to see your URL and type it into their browser’s address bar. You are also able to express, through text, images or graphics, what you are about.
How to
Create your file in your favourite graphics software (I have used fireworks). You will be optimising the image for PNG, JPG or GIF format later. For now, you need to set the dimensions of the image: 1600px wide x 1200px tall, resolution 72 px/in. This size canvas will help to ensure that your background image does not tile and is big enough to cover most screen resolutions.
The most important areas should be marked out with guide lines. Drag guides to the following locations within your file:
- vertical guideline at 2px from the left edge;
- vertical guideline at 180px from the left edge;
- horizontal guideline at 14px from the top edge;
- horizontal guideline at 80px from the top edge;
- horizontal guideline at 649px from the top edge;
- vertical guideline at 950px from the left edge;
- vertical guideline at 1100px from the left edge.
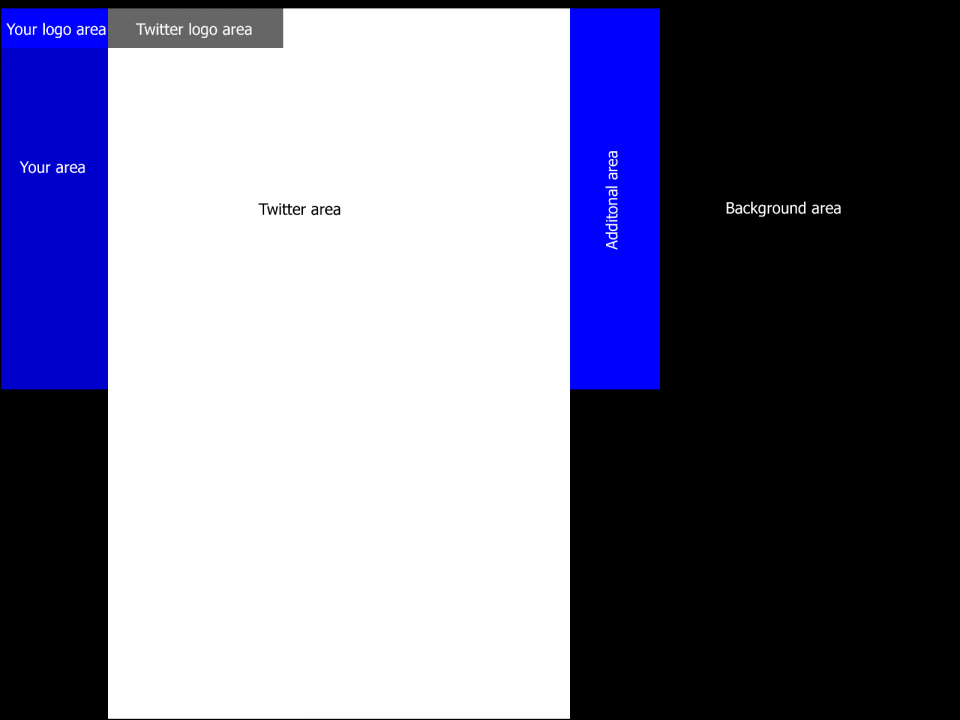
Add rectangles of different colours to these divisions to give you a basic wireframe that looks like this:
This grid defines the areas available to you to modify in blue. The black area is the background of your image and can be a gradient or solid fill, an image, etc. The areas in white and grey are used by the Twitter API and anything you put in these areas will be masked by or conflict with Twitter. Note: if you use the blue area on the right hand side of the Twitter API, be aware that this can expand and contract depending on the screen resolution, zoom level, text size and other settings of your visitors’ browsers. It can be partially or totally masked by the Twitter API, or fall off the right hand edge of the browser window at small screen resolutions. For this reason, it should only be used for secondary content.
Get creative
You can use anything you wish as your background image or fill. This should tie in with your overall theme, your brand and with the Twitter API. Note, it may not be the best idea to use adult themed, explicit, violent or other content that could cause offense; remember, the idea is to encourage visitors to follow you or visit your web site!
Your content area on the left should be used for your important information, contact details (website address, blog address, etc) and logo.
The content area on the right should only be used for secondary, non-important information. You do not have to use this if you don’t want to and bear in mind the notes I made above about how this may be displaced.
Save and upload
When you have finished creating your masterpiece, optimise it as a gif, jpg or png graphic. Gif should be used for any image that uses block colours only, jpg should be used for detailed images and png can be used for either. Make sure it is no more than 800k in size, to meet Twitter’s requirements.
All you need to do now, is upload your finished background:
- Log in to your Twitter account;
- Go to Settings;
- Click on the Design tab;
- Click on the Change background image button;
- Enter the location of the image you just exported and upload it;
- Deselect the Tile background image checkbox, unless you want the image to tile;
- Click on Save changes.
That is all there is to it. You may need to make some slight adjustments to the image and re-upload it. This is normal as the image varies at different resolutions and is affected by the floating Twitter API.
Let me know
Use the comments form for this post to leave your twitter URL. That way, other visitors can check out what you have done. Please let me know how you get on with this How-to guide, and leave any other tips and tricks that you think might be useful.
Glenn Reffin
Latest posts by Glenn Reffin (see all)
- Welcome to the new look - 14 February, 2022
- How to replace fonts using CSS3 font-face - 5 September, 2011
- 5 tips for better web site construction - 16 January, 2011
- 10 tips to write better content - 12 August, 2009
- 6 ways a small business can beat the recession - 29 June, 2009
- Social networking

